Over the past few years, Spawning Tool has grown a ton. Thanks to tournaments organizers and casual players, we have accumulated over 30,000 StarCraft 2 replays with 13 million build steps and 400,000 tags. Although the site can generate interesting statistics and predictions from the data, it can be daunting for players to find strategies to actually use in-game. You have to dig through hundreds of replays and hope to find a good, clean build order. We wanted to make that easier, so we’re releasing Spawning Tool Build Orders.
What do you do if you see a cannon rush? Maybe you cancel that base and go to the 3rd base location instead. Maybe you pull a few workers to try to poke it down in time. Or if you’re hydra, maybe you just pull the boys and go for a worker rush.
hydra goes Pool First against a Forge Fast Expand. His first expansion is to the gold base, but his Drone crosses paths with a scouting Probe. Seeing no natural expansion, the Probe turns around to cannon rush the gold base. Then, hydra pulls all except 3 of his workers with 6 Zerglings in production to go for the all-in.
Note one clever moment when hydra pulls back his Drones to wait for the Zerglings. Perhaps even more importantly, he saw the Probe leave the base, and that Probe could have potentially scouted his Drone rush with enough time wall in. By hiding them in the corner for a few seconds, he keeps the surprise on his side.
One more thing: hydra has his Drone mineral walk into his opponents base. This is quite important as this would allow him to walk past a “hold position” Probe into the base to attack a Photon Cannon. Stardust wasn’t walled in at all.
I wouldn’t recommend this as a planned opening, but keep it in mind as a response to a cannon rush. The game is going to degenerate quickly anyways, and I guarantee that this all-in will be quick.
Group D was the group of death: the reigning SSL Champion (Classic), the reigning GSL Champion (Rain), MVP’s top Protoss player (YongHwa). And Snute came out on top with an aggressive heavy Hydralisk style in ZvP.
Snute opens with a safe 15 Pool, 16 Hatch to avoid a cannon rush and transitions into a relatively normal 3rd base timing around 4:00 and Zergling speed soon after. Around 7 minutes, he goes up to 30 Zerglings to deny Rain’s 3rd base and immediately goes into Hydralisk production. He uses those to destroy the 3rd base again and create a soft contain. The safe opening allows Snute to apply pressure before typically 2 base timings come in from Protoss.
From here, Zerg will typically transition into either Infestors to lock down the Stalkers or more Vipers for the Blinding Cloud, but Snute gets away with building only 2 Vipers. Most of us don’t have army control like Snute, but he pulls it off with smart positioning and baiting forcefields. Keeping the Viper and Infestor count low leaves more gas for Hydralisks.
There are a few caveats to this style. First, this build is likely a response to the prevalence of Blink Stalkers in the current meta. Against a more traditional Colossi army, the mid-game pressure timing is much tighter. This seems like the biggest potential risk to this style
Second, there are different ways to transition. In his other games, Snute also opted for Roach Zergling pressure early on, so there are options for staying aggressive.
Third, Snute delays upgrades for a long time. His first attack/armor upgrade is +1 missiles at 12:00. This might be a risk against a double Forge style with more armor upgrades to buffer against the Hydralisks. To sustain the attack, you probably will need to go up to 4 bases. Snute gets it very late in this game, but you can see other timings in his games against Classic
Fourth, the late-game composition is presumably more flexible for how the Protoss responds. Against High Templar, Snute opted for more Roaches. If he had seen more Colossi, I would guess you would get more Vipers for the Abducts.
So in summary, safe opening + big Speedling attack + mid-game Hydralisk contain = devastated GSL/SSL champions
Check out the rest of this series and Snute’s series against Classic for more games like this http://spawningtool.com/28108/
For a long time, Spawning Tool lampshaded its lack of support for Chrono Boost. The timing on Protoss build orders was consistently a few seconds ahead for upgrades and some units, and we just marked it as a “caveat.” With the release of filterable build orders (that included workers) and playable build orders (where times really matter), it became very apparent that we needed to correct that. So we did.
For the curious, we can go into more details about the technical challenges to get to here and the remaining issues with it.
Why we were lazy about fixing it
Chrono Boost has been marked as an issue to address for a few months now but has been a known issue for over 2 years. It has been tricky because the data between casting abilities and building units is hard to line up. Continue reading →
From an outsider’s perspective, a build order is just a build order. It’s an ordered list of units being built. However, there are many ways to both represent and read build orders, and Spawning Tool has added a bevy of options to present build orders differently.
Filter Build Orders by Unit Type
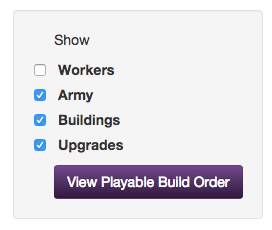
Traditionally, build orders don’t show workers: you just assume that workers are being built constantly unless the supply counts don’t match up. If you want a really precise build order, we put that data back in, so on the side of build orders, you should see this box:
Check or uncheck the different options to see only specific sets of units in the build. Maybe all of the Zerglings are cluttering Scarlett’s build order, and you just want building timings. No problem. Or maybe you just want to quickly scan upgrade timings across builds. Or maybe you want to see every little detail. All of those are possible. Continue reading →
At Spawning Tool, we’re all about labeling StarCraft replays with build orders. With tens of millions of unit build events tracked, build order labels are a good way to simplify and make that data more accessible. Spawning Tool collects build order labels from various sources, including:
machine learning – given many examples and counter-examples of Bio Mine builds, which unlabeled builds look the closest?
programmatic logic – if there are 2 Hatcheries built before the first Spawning Pool, it’s a “3 Hatch before Pool”
community-approved suggestions – the yes/no you sometimes see on replays
community-contributed labels – anything else the community punches in
Our certainty about the labels follows the list above as well: we are relatively uncertain of the labels from machine learning but highly certain on those contributed by hand. The gray area, however, has always been those in the middle: how certain do we have to be to add the build orders straight into the system versus just posing it as a suggestion?
After going through the data, we determined that openings are relatively standard, and have shuffled most of those to be automatically, programmatically labeled for you. By cleaning this up, we added ~9900 new build order tags. We also removed ~5000 suggestions that were relatively obvious. Currently, the list of programmatic build order labeled are:
Zerg: 3 Hatch Before Pool, X Pool X Hatch, X Hatch X Pool, X Pool (10 and below)
Overall, we hope that this greatly increases the quality and accessibility of our build order data. However, the data can always be better, and we would appreciate suggestions for more build orders that we can add into the system. Our hope is to come up with a broad taxonomy for build orders to label all of them and understand the relationship between them.
And even if you don’t have any new ideas, we would appreciate any help approving existing suggestions. We still have over 10,000 undecided suggestions that all of you should feel welcome to adjudicate on.
Part of learning a new meta-game is learning new cheese strategies, and the 4 Gate Adept build popularized by Geiko is a pretty strong Protoss cheese, so here is our first Legacy of the Void (LotV) Protoss build order.
The basic gist of the strategy is to abuse the mobility and tankiness of Adepts. With the Shield Upgrade from the Twilight Council, Adepts have 90 Health and 140 Shields (and 1 armor). Although they have relatively low DPS because of a slow attack speed, their bonus damage against light units allows them to 2-shot workers, Combat Shield-less Marines, and Zerglings.
Above all that, they also have the Psionic Transfer ability to create a shade to bypass static defenses and attack in 2 locations at once. You can also cancel the shade so that Adepts can effectively threaten the main and natural bases simultaneously, forcing the defender to split up or be left completely defenseless.
The build itself is relatively straightforward, and Geiko provides a good explanation in the TL thread: open 2 Gate to harass. Get your Twilight Council for the Shield Upgrade and 2 more Gateways and place a proxy Pylon to start wailing on your opponent. With the Twilight Council, you also have the flexibility to mix in DTs, just to make their lives even more difficult.
This particular game against ViBE shows how strong this build is against Zerg. Going down the list of potential defenses,
Zerglings die in 2 shots
Queens aren’t numerous enough
Spine Crawlers can be bypassed
Roaches aren’t fast enough and actually have less HP/Shields than an upgraded Adept
Although ViBE defends well against the initial 2 Adept poke and even the first warp-in, the next wave of Mass Adepts (still off of 1 base) is too much to handle, even with burrowed Roaches.
This announcement comes a few days late for those who either frequent reddit or watch Fight Night, but there aren’t enough ways to say how excited we are to be sponsoring Team Gravity and their Sunday night series, “Team Gravity’s Fight Night”.
If you have been keeping up with the data on Spawning Tool, this announcement should be no surprise: Team Gravity has been phenomenal in regularly sharing the replays from Fight Night every week. They believe, like Spawning Tool, in having replay data openly available for the community and students of the game. Both through the players and events they support, Team Gravity embodies the spirit and values that we believe are necessary to maintain a vibrant StarCraft 2 scene in North America, and we are proud to be sponsoring them.
What is Spawning Tool? Spawning Tool is a website where you can easily browse pro replays by matchup, build orders, maps, or players. It makes it easy to find, learn, and evaluate new build orders and pull together interesting stats about players and upcoming matches.
What is Team Gravity’s Fight Night? Fight Night is a weekly $100 show match series consisting of two preliminary BO5, and a main event as a BO7. You can see the full list of past participants on liquipedia, but Fight Night #19 featuring TaeJa v PartinG gives you a sense of the caliber of players participating. The events are also sponsored and streamed exclusively on hitbox.tv
You can follow us at @spawningtool or Team Gravity at @TeamGrav for the latest news on what we’re up to. We all hope you are watching Fight Night on upcoming Sunday evenings!
Game 2. Overgrowth. Grand Finals. What do you expect Maru to do? Proxy of course. Maru goes for a proxy marauder. He places it right below Dream’s base, because he expects dream’s reaper to go scout to the his third, then go to Maru’s base (which would then make his barracks unscouted). These type of attempted mindgames only take place in matches where the players know each other very well.
After dream scouts the proxy marauder, he makes the choice to send his reaper to Maru’s base instead of using it to defend. This choice would let him get scv kills, while still defending his own base by pulling scvs.
Maru ends up getting a surround on the reaper which potentially saves this game for him. He had no units on his own side of the map, so this reaper could have been game ending.
After the multitasking dies down, maru goes 3cc! In units, he has a hellion, reaper, and a marauder to defend against any aggression that Dream would throw at him. This is the definition of greed, which is not usually Maru’s play style. He is usually the one multitasking the opponent and constantly applying pressure.
One of the more impressive things in this game is how Maru defended against Dream’s medivac drop at ~ 7:00. His micro is top notch. The fact that he defended this aggression so well means that he can get away with his 3cc. Dream’s followup banshee also gets deflected by a hidden widow mine!
The game evens up after Dream gets 8 scvs in a sneaky double medivac drop as Maru moves his army out onto the map. In order to kill just a little more scvs, he does not attack with his marines until he is on top of the mineral line.
Maru actually forgets combat shields and does not have it researched until ~17:00. Dream did not capitalize on this though.
At around the 18 minute mark, dream sneaks about 30 marines into Maru’s natural and ends up killing a command center. This forces Maru into a counter attack which kills dreams 3rd command center.
These guys are trading blow for blow in the mid-game. They both managed to get maxed by the 16 minute mark, but end up at 100 supply each at the 19 minute mark.
Maru who still has an army advantage and the air advantage closes in and forces Dream into a contain. With great siege tank placement he manages to stop the mining at the natural and forces dream to try something crazy.
Dream ends up trying for a surround by dropping marines behind Maru’s army then attacking with both halves. It almost works, because he has a slight upgrade advantage, but Maru’s medivac count is what saves him. Who would have thought this all started with a scouted proxy marauder? Well, I guess Maru would have ;P
So far, the metagame in the Legacy of the Void beta has been hard to decipher while players are still figuring out the game. Openings are definitely inspired by existing builds, but exact timings and supply counts don’t match. Compositions from then on out are a mish-mash of all units with multiple pivots in-between. It has been really inspiring to see how players are using new units.
As I was going through LotV replays on Spawning Tool, however, I noticed that Nathanias has done new things with old units in reviving a version of the old iEchoic build from Wings of Liberty TvT. The exact build is not too important, but looking at the build order, the important thing is that he starts with Hellions and Banshees, then transitions into Hellions and Battlecruisers. That’s basically the idea.
The build worked in TvT with the basic assumption that there are 3 units that Terran have to counter air: Marines, Thors, and Vikings. At the time, Thors didn’t have the High Impact Payload, so with enough armor on Battlecruisers, neither Thors nor Marines could really handle them, except in very large numbers. Large numbers of Marines get roasted by blue flame Hellions, and Vikings can be countered by more Vikings, and hence, air superiority wins. And all of this can be achieved on a few Factories and Starports by moving add-ons back and forth.
In modern TvZ, Zerg has Queens, Hydralisks, Mutalisks, Corruptors, and Viper’s Parasitic Bomb. To be totally honest, I have no idea why this build should work. I guess standard ZvT is Muta-Ling-Bane. The only meaningful change as part of LotV that I can think of is the Tactical Jump, which would seem to help a lot.
Sorry for not providing more insight on this build, but I don’t have a VOD link, and I can’t watch the replays. Even so, hopefully there are more of you out there who are just as excited as I was to see this build come back. Let me know how this works for you in the beta!