Of course, LotV isn’t coming out for another month, but we actually just saw our LotV beat HotS in our google analytics data, so it seems that the tide is turning, and we want to make sure that the most useful data is available easily. We will, for the foreseeable future, continue to keep our HotS site online, but especially with the replay format changes, those replays just aren’t so useful anymore.
One question we have had a few times is why we split the sites. The primary reason is because the data is very different, and we had to have separate logic for both of them. Specifically, the unit types and game speed actually require different backends in place. Because of that, we felt that the data was altogether incompatible, so keeping them together would just muddle up statistics.
As for why you don’t share you user account between the two? That’s mostly laziness. The 2 sites are on different databases, and I didn’t put forth the effort to sync up the authentication between them.
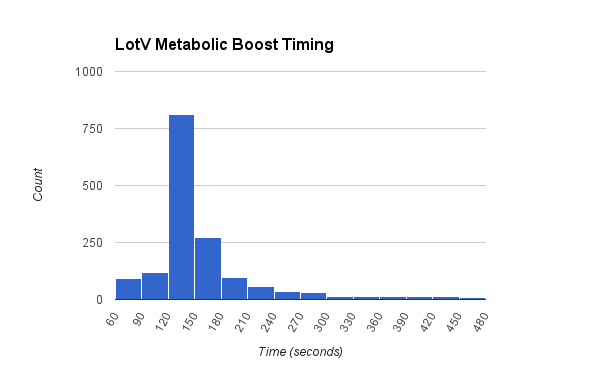
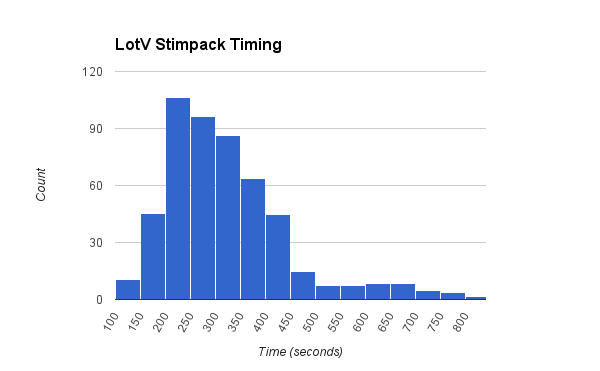
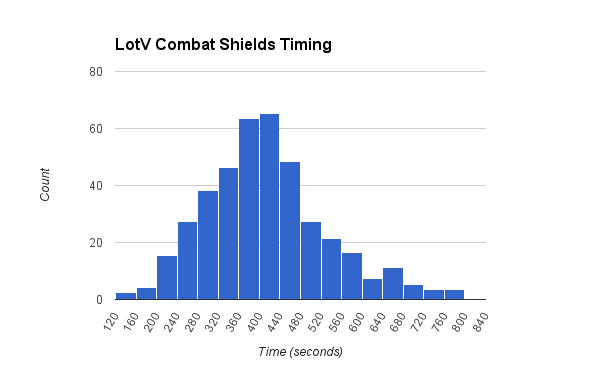
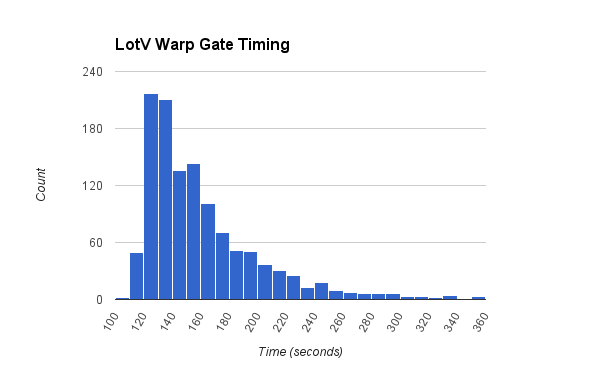
These histograms show the research time for various upgrades in Legacy of the Void. The data comes from ~2200 replays uploaded to http://lotv.spawningtool.comof all levels of play from the beginning of beta. About 25% of games are from professional tournaments. The same includes about 1500 Zerg replays, 1200 Protoss replays, and 1000 Terran replays.
The graphs are bucketed by LotV (real-time) seconds. In some cases, extreme outliers to the right have been removed from the data for a better visualization. Note that the Warp Gate timings may not be exactly right while Blizzard tweaks with the exact impact of Chronoboost, but it should still be very close.
If you want to play around with the data yourself, you can see it at
Let us know if there’s anything else you want to see from our data. We will try to see what we can do, but in the mean time, play around with the research tool to see what you can find yourself! http://lotv.spawningtool.com/research/winrates/
Also, if you could help us make the data as accurate as possible by uploading your replays, that would be amazing!
I saw this build on /r/allthingsterran. /u/Bakemonoda had posted a video on the build where he explains the build. He was more than willing to upload the replay and let me do a write up on it for a build of the week, so thanks to him for that.
Basically this build puts the pressure on the protoss before they can get a warp prism out, then the cyclones can deal with the warp prisms after it’s out :D. The protoss opens standard, but this build still does a good amount of damage/game ending damage.
The goal is to do some damage with the proxy reaper, then follow up with cyclones to finish off the game/put yourself in a game winning position.
The proxy reaper is extremely effective in LotV right now. The reapers arrive before a mothership core is out (on a two base protoss opening) and they can do big damage by kiting around the adepts/stalkers. The bombs also disrupt mining/give extra kills.
By the time that the mothership core can get out (if the protoss decides to make it), there will be a cyclone to target it down. After the third reaper, you can also lift the barracks and float it at a ramp/cliff, for the cyclones, so they can have vision and target stalkers/adepts on top of the ramp. This takes away most of the defenders advantage that the protoss would normally have with terrain.
Reapers also can give vision by jumping up on the cliffs/suiciding up ramps to give vision.
Using the reaper bombs to keep the stalkers/adepts from attacking is also another strong thing that you can do to keep the cyclones from taking damage. The reapers are only there to distract/tank for the cyclones. The fact that both of the units in this cheese have high speed makes it hard for the protoss to deal with. The only thing that they can really do is try to save the MSC to photon overcharge some or use the adept ability really well to counter the speed of the terran units.
The latter is the best of the two in my opinion, because photon overcharge only last like 11 seconds as of the last patch.
The followup for the build is just getting another CC and another factory (if you want to go mech). If you want to go bio, I would reccomend floating the barracks back home, switching it with the factory after about 3 cyclones, and starting stim right away, along with more barracks.
Over the past few years, Spawning Tool has grown a ton. Thanks to tournaments organizers and casual players, we have accumulated over 30,000 StarCraft 2 replays with 13 million build steps and 400,000 tags. Although the site can generate interesting statistics and predictions from the data, it can be daunting for players to find strategies to actually use in-game. You have to dig through hundreds of replays and hope to find a good, clean build order. We wanted to make that easier, so we’re releasing Spawning Tool Build Orders.
What do you do if you see a cannon rush? Maybe you cancel that base and go to the 3rd base location instead. Maybe you pull a few workers to try to poke it down in time. Or if you’re hydra, maybe you just pull the boys and go for a worker rush.
hydra goes Pool First against a Forge Fast Expand. His first expansion is to the gold base, but his Drone crosses paths with a scouting Probe. Seeing no natural expansion, the Probe turns around to cannon rush the gold base. Then, hydra pulls all except 3 of his workers with 6 Zerglings in production to go for the all-in.
Note one clever moment when hydra pulls back his Drones to wait for the Zerglings. Perhaps even more importantly, he saw the Probe leave the base, and that Probe could have potentially scouted his Drone rush with enough time wall in. By hiding them in the corner for a few seconds, he keeps the surprise on his side.
One more thing: hydra has his Drone mineral walk into his opponents base. This is quite important as this would allow him to walk past a “hold position” Probe into the base to attack a Photon Cannon. Stardust wasn’t walled in at all.
I wouldn’t recommend this as a planned opening, but keep it in mind as a response to a cannon rush. The game is going to degenerate quickly anyways, and I guarantee that this all-in will be quick.
In this game, TY opens with a CC first into a gas before his barracks. This is the most greedy you can be in the early game. He only has one marine out before the 6 minute mark (which he uses to deny scouting). The reasoning behind this is the fact that snutes reaction to the CC first is to go 3 hatch before pool. This is a dream scenario for TY. He quickly adds his second gas to get access to fast tech.
This is a game where TY gains small leads off of early harass. His first mode of harass is the hellions. He makes 4 hellions off of his factory, which ends up roasting 4 drones. This is not a big deal, but it sets snute slightly behind. TY also keeps his hellions alive, to use for more harass throughout the early game.
TY’s second mode of harass is the viking. He uses this to deny overlord scouting, forces snute to spend money on non army related units, and take map control. In the early game, droning up to 3 1/2 base economy is the most important thing for a macro zerg. Setting that back at all can delay the army/tech and make follow up pushes game ending.
TY’s third mode of harass is a widow mine drop. He sends out a medivac with 2 widow mines and 4 marines which kills 8 drones.
All of these small edges that TY gained puts him in a position where Snute’s tech and saturation is delayed. Behind all of this harass, TY is researching stim, making tanks, adding gas, starting double upgrades, and adding more barracks.
The viking is used to push back and kill overlords out on the map, making it so snute does not see the move out with marines, medivacs, and tanks at around 10:30. TY takes a third behind this.
Bridgehead is known as a map where the terrain can be abused. The rocks at the natural have been an issue for many players. TY sieges his tanks behind these rocks while he drops the marines on Snute’s side of them. This creates a strong and very difficult to defend position for snute. It is a very similar strategy to the deadwing one, where you siege behind the rocks in between the natural and the third. This is why zergs always break the rocks there and have also started breaking the rocks on BridgeHead. TY kills Snute’s natural with this push and gains a large supply lead. Snute has almost triple the units lost compared that that of TY after this maneuver.
The aggression doesn’t stop here though! TY keeps dropping in Snute’s natural and 4th, denying the bases and denying mining! Snute does not successfully retake his natural until the 17 minute mark, only to be quickly denied again by TY. Throughout all of this, TY continues to drop marines and widw mines killing drones constantly!
Snute holds on well, but in the end TY’s early game lead, mechanics, and micro prove too much! This is one of my favorite games of all time, I think it’s a must watch!
I chose this build for a replay of the week because of the similarities it shows to Heart of the Swarm. The only main changes are what you can afford and when. Also, in Legacy of the Void, CC First is a much more viable build because of how fast you can get the command center down, compared to the rush distance on maps. The economy change made it so every race can get down buildings and expansions faster, but the time it takes for a unit to go across the map still stays the same, making greedy builds more viable in this new expansion.
Legacy has been pushing towards a more micro and agression based play. With all of the changes, it is harder to get maxed because of how fast your enemy attacks or you attack. Also, in my opinion, upgrades matter even more because turtling is harder to do.
This build starts off with a CC First into a quick 3-rax play. The point of the build is to try to get +1 attack, stim, combat shield, two medivacs, and 16 marines out as fast as possible. When you get these units, you have a ton of utility on the map to do one big attack, multi-prong attack them in their 3rd and main, or just force units out of them. After the starport goes down, I add a quick 4th and 5th barracks to create a strong followup push. This makes the build very all in. It is very hard to transition when you are constantly building out of 5 rax, a factory, and a starport. The amount of units that come for the followup push make up for this though.
One important thing is to stop producing SCVs once you get two base saturation and 3 gases.
Again, this is a very micro oriented build. Misclicks lose games with builds like this. I managed to get lucky and snipe his morphing banelings this game, but if they had formed, I would have split, picked up, and then kept on with the multipronged attacking!
Group D was the group of death: the reigning SSL Champion (Classic), the reigning GSL Champion (Rain), MVP’s top Protoss player (YongHwa). And Snute came out on top with an aggressive heavy Hydralisk style in ZvP.
Snute opens with a safe 15 Pool, 16 Hatch to avoid a cannon rush and transitions into a relatively normal 3rd base timing around 4:00 and Zergling speed soon after. Around 7 minutes, he goes up to 30 Zerglings to deny Rain’s 3rd base and immediately goes into Hydralisk production. He uses those to destroy the 3rd base again and create a soft contain. The safe opening allows Snute to apply pressure before typically 2 base timings come in from Protoss.
From here, Zerg will typically transition into either Infestors to lock down the Stalkers or more Vipers for the Blinding Cloud, but Snute gets away with building only 2 Vipers. Most of us don’t have army control like Snute, but he pulls it off with smart positioning and baiting forcefields. Keeping the Viper and Infestor count low leaves more gas for Hydralisks.
There are a few caveats to this style. First, this build is likely a response to the prevalence of Blink Stalkers in the current meta. Against a more traditional Colossi army, the mid-game pressure timing is much tighter. This seems like the biggest potential risk to this style
Second, there are different ways to transition. In his other games, Snute also opted for Roach Zergling pressure early on, so there are options for staying aggressive.
Third, Snute delays upgrades for a long time. His first attack/armor upgrade is +1 missiles at 12:00. This might be a risk against a double Forge style with more armor upgrades to buffer against the Hydralisks. To sustain the attack, you probably will need to go up to 4 bases. Snute gets it very late in this game, but you can see other timings in his games against Classic
Fourth, the late-game composition is presumably more flexible for how the Protoss responds. Against High Templar, Snute opted for more Roaches. If he had seen more Colossi, I would guess you would get more Vipers for the Abducts.
So in summary, safe opening + big Speedling attack + mid-game Hydralisk contain = devastated GSL/SSL champions
Check out the rest of this series and Snute’s series against Classic for more games like this http://spawningtool.com/28108/
For a long time, Spawning Tool lampshaded its lack of support for Chrono Boost. The timing on Protoss build orders was consistently a few seconds ahead for upgrades and some units, and we just marked it as a “caveat.” With the release of filterable build orders (that included workers) and playable build orders (where times really matter), it became very apparent that we needed to correct that. So we did.
For the curious, we can go into more details about the technical challenges to get to here and the remaining issues with it.
Why we were lazy about fixing it
Chrono Boost has been marked as an issue to address for a few months now but has been a known issue for over 2 years. It has been tricky because the data between casting abilities and building units is hard to line up. Continue reading →
From an outsider’s perspective, a build order is just a build order. It’s an ordered list of units being built. However, there are many ways to both represent and read build orders, and Spawning Tool has added a bevy of options to present build orders differently.
Filter Build Orders by Unit Type
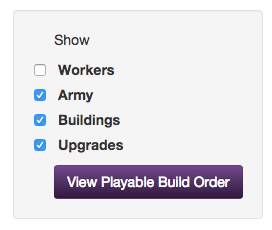
Traditionally, build orders don’t show workers: you just assume that workers are being built constantly unless the supply counts don’t match up. If you want a really precise build order, we put that data back in, so on the side of build orders, you should see this box:
Check or uncheck the different options to see only specific sets of units in the build. Maybe all of the Zerglings are cluttering Scarlett’s build order, and you just want building timings. No problem. Or maybe you just want to quickly scan upgrade timings across builds. Or maybe you want to see every little detail. All of those are possible. Continue reading →